Notice more dust and dander accumulating around your home? Hot / cool air not circulating like it should? Experiencing more allergy symptoms than normal? If you answered yes to any of these questions then it is likely time to change your furnace filter.
Changing your furnace filter regularly is an important part of maintaining a clean and controlled indoor air environment. Failing to do so can can damage your HVAC equipment and even your health.
The only thing worse than not changing your furnace filters frequently is not changing them correctly. Although it its a quick and easy process, many homeowners miss crucial steps when changing their furnace filter. In this article, we will break down how to change your furnace filter the right way, with five easy steps.
Note: If you already have your filter on hand, skip to step 3!
1. Identify When It Is Time To Change Your Furnace Filter
You reading this article probably means you have already identified you need to change your furnace filter, so congratulations –– you have already completed step one!
If you are still unsure, however, consider these signs that your furnace filter is ready to be replaced:
- Dust and other debris accumulating around your home and air vents
- Higher energy bills
- Living areas do not receive the proper amount of heating and cooling
- Problems with your HVAC equipment (e.g. frequently shutting down)
- Increased allergy symptoms and/or restricted breathing
- Poor sleep and/or lack of concentration
2. Purchase A New Furnace Filter (Critical Step)
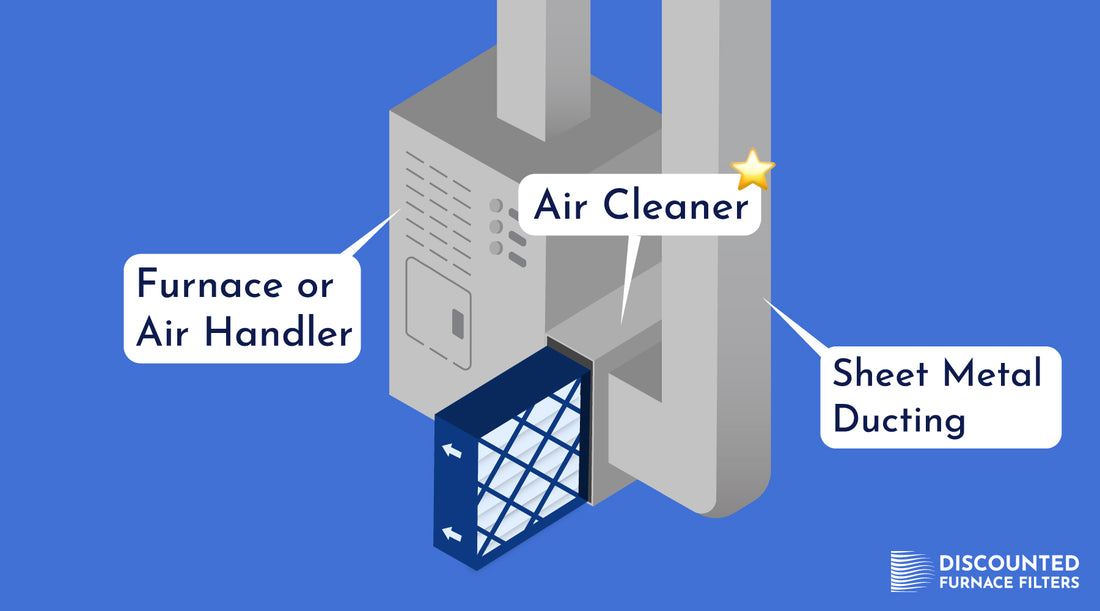
Once you have identified that it is time to change your furnace filter, the next step is to buy a replacement filter. To determine which filter your air cleaner needs, reference the manufacturer and model number on the outer sides of the air cleaner cabinet, on its door, or find this information in the Owners Manual. Note: It is important that you find the model number of your air cleaner not your furnace or air handler. The air cleaner is the housing where the filter goes. It is generally found where the sheet metal ducting returns air to the furnace (see diagram below).

Having problems finding the model number of your air cleaner? Contact us and we will be happy to help!
Now that you have your model number, input the model number here to find the genuine OEM filter your air cleaner needs. No results? Contact us and we will be happy to help!
Once you think you have found the right filter, just take a moment to confirm that the actual size and MERV rating matches what is recommended by the air cleaner manufacturer. There are two things to keep in mind when doing this. Firstly, most filters have an actual and nominal (rounded) size. It is important that you follow the actual size because that is going to ensure the best fit. Also, you may notice your air cleaner accepts filters of the same size but different MERV ratings. Generally, the rule of thumb for choosing between MERV ratings is the higher the MERV rating the more air contaminants you want removed from your air. This may be the case if you suffer from allergies, live near a freeway or construction zone, have pets or a large family, etc.
The last thing you need to consider before you purchase your filter is if it is OEM. OEM stands for “Original Equipment Manufacturer.” This means OEM filters are the official, genuine filters produced directly for your air cleaner. You may notice other, cheaper filters on the market –– when possible, homeowners should purchase genuine OEM filters from authorized manufacturer distributors (like us!).
3. Remove Dirty Furnace Filter
Now that you have the right filter, it is time to remove the dirty filter. First, turn OFF your HVAC equipment from the power shut off switch which should be located somewhere near your system. If you are unable to locate it, then you can turn off the system from your hydro panel. We DO NOT recommend that you turn off your system from the thermostat, as you risk someone turning the system on while you are changing the filter.
Now that your system is off, you need to take some safety precautions before you remove the dirty filter. First, put on a face mask and gloves to protect you from any of the living contaminants on the dirty furnace filter. Also, have a garbage bag on hand for you to seal the dirty filter in.
With your gloves and mask on, go to the air cleaner and open its door. Remember, the air cleaner is generally located where the sheet metal ducting returns air to the furnace (see diagram above). Slowly, remove the furnace filter and carefully place it into the garbage bag before tightly sealing it. Dispose of the dirty filter according to your municipality waste management.
4. Install New Furnace Filter
Before you place the new filter in the air cleaner, make sure to write the date on the filter so you know when you last changed it. We also recommend that you create a calendar reminder to change your filter in 4-6 months, depending on your filter change frequency.
Position the filter with the arrows pointing in the direction of the air flow. If you are not sure which direction the air is flowing, consider this rule of thumb: the arrows on the furnace filter should always be pointing toward the furnace or air handler. Slowly push the filter into the air cleaner until it is snugly in place. Finally, close the door on the air cleaner and turn your HVAC equipment power switch back on.